Monday, February 18, 2013

Big Bow Baby Hat Patterns


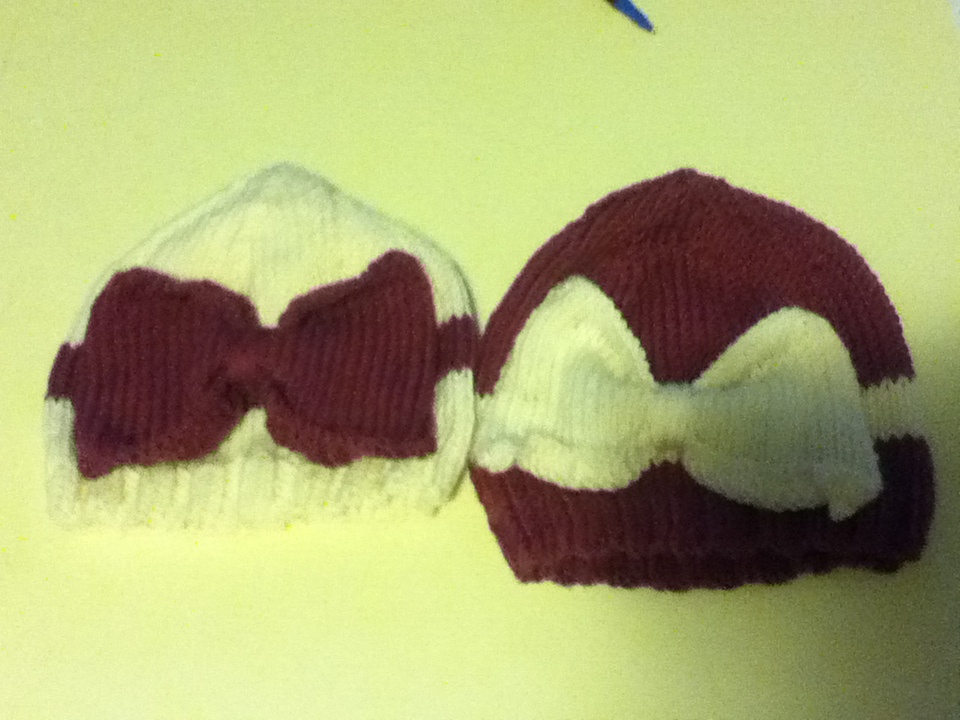
These baby hats are sooo cute!! I saw a picture of something that looks exactly the same on Pinterest but there wasn't a pattern to go with the picture. I loved it so much that I just decided to make a pattern up myself. The giganticness of the bow is the best part. The yarn I used is machine washable and relatively inexpensive and it's really soft too. In this picture the white hat with the raspberry colored bow looks a lot smaller but both hats are exactly the same size. I'm not really sure what age babies these would be good for. I didn't really think that part out.


Materials:
Dk weight yarn in 2 colors (for two hats I used less than 127 yards)
Size 6 straight needles
Yarn needles

Yarn I Used:
Sublime baby cashmere merino silk dk in shades 0003 and 0217

Directions:
     Hat:
CO 72sts
Work in K2, P2 rib for 6 rows
Work in stockinette stitch for 6 rows
Change color
Stockinette stitch for 6 rows
Change color
Stockinette stitch until entire piece measures 4 1/2 inches
K5, (k2tog, k9) repeat directions in ( ) across the row
Purl
K4, (k2tog, k8) repeat directions in ( ) across the row
Purl
Repeat decreasing the amount of stitches before each decrease until you get to k2tog all the way across. Cut they yarn leaving about 10 inches and bring it through the stitches. Take all the stitches off the needle and pull the yarn tight so they all come together. Use the same yarn to sew the seam on the side of the hat. Weave in the ends to hide them.
     Bow:
CO 35
2 Rows K2, P2 rib
22 Rows Stockinette stitch. Purl the 1st and last stitch of every knit row to prevent rolling
2 Rows K2, P2 rib
Bind off
Cut a piece of yarn about 15 inches. Pinch the center of the bow with the rib rows on the top and bottom and wrap the yarn around the middle and use the 2 ends of the yarn to attach it to the stripe on the hat. Cut some smaller pieces of yarn and use them to tack the sides of the bow to the hat so they don't flop over. Make sure the pieces used for securing are tied tight so they don't come undone.


Saturday, February 9, 2013

Lesson 6: Flat Out Flat

K so there's a few different meanings for stiches in knitting. There are the stitches knit and purl and those are the basics, but you combine those two in different ways to make totally different looks. You can make knitting pieces look actually flat on one side and bumpy on the other. It's crazy.

The first stitch you should know is called stockinette stitch. It is probably the single most common stitch in the knitting world if you don't count cables and fancy lace patterns and that shtuff. This stitch will make your knitting look smooth and flat, just flat out flat, on one side and kinda like gravel on the other side. The best part is you don't even need to learn any new techniques! Basically just do one row in knit stitch then on the next row do the purl stitch. Keep alternating between those two stitches and BAM! You have stockinette power!

Next up: garter stitch. You have secretly been doing this the entire time. It's a conspiracy. You knit every row. No purling involved. Yep that's pretty much it.

Ribbing is usually done in the beginning of a piece or sometimes for the entire thing. It adds a nice edge and it's wicked stretchy. You can see it in most sweaters on the bottom hem and the sleeve cuffs. It looks like this:


There are different types of ribbing but they are all basically the same thing. You knit some stitches the move the yarn between the needles to the front of the work and purl some stitches. Then, you move the yarn back between the needles to the back of the work where it started and knit more stitches. You just repeat that process until you get to the end of the row and on the next row you do the same pattern. Whether you start with a purl or knit stitch on the next row is determined by the last stitch you did on the previous row. If you did knit stitches on the first row the 2nd row will start with purls and so on. The pattern you use will tell you how many stitches to knit and purl. In this picture it's k2, p2. It could be abbreviated ad k2, p2 rib or 2 by 2 rib. There are other styles such as k1, p3 which has a much different look or k3, p2 which looks different too. You can experiment with the different types if you want.

All of these stitches can combine or just one can be used in a pattern to make the knitting look interesting and unique. I think you should practice stockinette stitch and ribbing the most since those are the hardest to learn plus you have already done garter stitch. Also because the first pattern I post will use both of those. (I have a master plan behind all of this posting)
Peace out.

Friday, February 8, 2013

Lesson 7: Messin With Your Eyes

Welcome back! I bet you have been wanting to know how to shape your knitting. I'm kidding. You might not have any idea about what I'm talking about. When you add shape to knitting you have to decrease and/or increase the amount of stitches on the row once you are already into a piece. By doing this you will make the knitting smaller or bigger. It's hard to explain. How about some visuals?

Here is a piece that has a lot of decreases in it. That's why it appears to get narrower at the top. It isn't just messin with your eyes. When you decrease you can use different methods to make the decrease go in different directions. That's why the lines near the edges in the picture go like this / \ instead of this // or this \\. I'll teach you the easiest ways to decrease. They are pretty simple I think.


For increasing It's a similar story. There are different ways that make the stitches appear to go in different directions. This is what it looks like. Bigger on the top. I should probably mention that when you knit you almost always go from the bottom up. I can see how that would be confusing. You can increase or decrease a little or a lot. It all depends on what shape and size you want the knitting to be.


So the first style of decreasing is knit 2 together (abbreviated as k2tog in almost every pattern). In this method you take 2 stitches and join them together into 1. It is really simple to do also which is convenient. Basically just knit normally except in the first part when you put your needle tip into the stitch put it into 2 stitches not just one. Then knit them together as if they are one. On the next row it will just be one normal stitch.


Next is purl 2 together (p2tog). This is less common because a lot of the time shaping is done on the knit rows. It's pretty much the same exact thing as k2tog except you treat the 2 stitches like 1 purl stitch. Simple.

For increasing there isn't really a way to do it that's as simple as those decreases. One way I like is called make 1 (m1). You have to do this between stitches. Just put the needle tip between two stitches under this thing called the bar. The bar is the strand that you can see if you stretch the work and move the needles away from each other.


Pick up the bar on the LH needle and knit into the BACK of it. What I mean by the back is in that picture right there.
If you don't knit into the back of the stitch you will get holes in the knitting on all the m1s so make sure you do that.

So there are some increasing and decreasing methods. There are some more advanced ones which I will make posts about in the future. But now since you know about shaping I am going to put up a pattern in the next post! I know it took forever to get through all these lessons but hey you gotta start somewhere. Adios


Lesson 5: The Grand Finale

So now you know all this wonderful stuff about knitting! Unless you just wat to knit one endless strip I suggest you learn how to bind off. It's important that you bind off correctly or you work will unravel and that would just be a problem. There are a lot of different methods to this that will give you a fancy edge, but this is the most basic and you will end up with a clean straight line on top.


The first thing you want to do is knit (or purl) 2 stitches. No more, no less.


Now use the tip of the LH needle to bring the last stitch on the RH needle (the first one you knitted) over the top of the other stitch.


This might be a little difficult a first and especially if you knit the stitches too tight. Make sure the first stitch doesnt come off too when you do this.


 After you bring it over the top of the other stitch slide it right off the needle.


Then knit another stitch from the LH needle and repeat the process of bringing the last stitch over the first one and off the needle.


Keep on doing this until there are no more stitches on the LH needle and there is only one stitch left on the RH needle. Cut the yarn about 5" away from the work (or longer if you are using the tail to sew peices together) and pull it throgh the loop. Pull it tight so it is secure and you are done! See it's not that hard is it. Well maybe. But the brigt side it you will only have to do this once for every piece you knit.


You can leave questions as comments if you want. Happy knitting :)