 Here is a piece that has a lot of decreases in it. That's why it appears to get narrower at the top. It isn't just messin with your eyes. When you decrease you can use different methods to make the decrease go in different directions. That's why the lines near the edges in the picture go like this / \ instead of this // or this \\. I'll teach you the easiest ways to decrease. They are pretty simple I think.
  For increasing It's a similar story. There are different ways that make the stitches appear to go in different directions. This is what it looks like. Bigger on the top. I should probably mention that when you knit you almost always go from the bottom up. I can see how that would be confusing. You can increase or decrease a little or a lot. It all depends on what shape and size you want the knitting to be.
  So the first style of decreasing is knit 2 together (abbreviated as k2tog in almost every pattern). In this method you take 2 stitches and join them together into 1. It is really simple to do also which is convenient. Basically just knit normally except in the first part when you put your needle tip into the stitch put it into 2 stitches not just one. Then knit them together as if they are one. On the next row it will just be one normal stitch.
 Next is purl 2 together (p2tog). This is less common because a lot of the time shaping is done on the knit rows. It's pretty much the same exact thing as k2tog except you treat the 2 stitches like 1 purl stitch. Simple.
 For increasing there isn't really a way to do it that's as simple as those decreases. One way I like is called make 1 (m1). You have to do this between stitches. Just put the needle tip between two stitches under this thing called the bar. The bar is the strand that you can see if you stretch the work and move the needles away from each other.
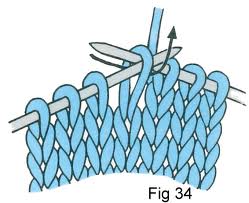
Pick up the bar on the LH needle and knit into the BACK of it. What I mean by the back is in that picture right there.
If you don't knit into the back of the stitch you will get holes in the knitting on all the m1s so make sure you do that.
So there are some increasing and decreasing methods. There are some more advanced ones which I will make posts about in the future. But now since you know about shaping I am going to put up a pattern in the next post! I know it took forever to get through all these lessons but hey you gotta start somewhere. Adios
No comments:
Post a Comment