Thursday, September 5, 2013

Lesson 10: Around and Around and Around We Go

Sewing the seams in small pieces bugs me. I really can't stand it. That's why I'm
glad for circular knitting. It truly is a gift from above. 
Circular knitting is when you use double pointed needles or a circular needle to knit the pieces in the shape of a tube. You can add increasing, decreasing, pattern stitches, and colorwork just like regular knitting so it's pretty easy to learn! 
The first method I'm going to show you is using a circular needle. This is extremely easy to do especially after a bit of practice. Circular needles are basically just two short needles connect by a long thin cord made of some type of plastic. The package they come in will tell you two measurements: length and needle size. They look like this:
Using them is really easy. Just cast on the number of stitches you need (the length of the needle will depend on the nber if stitches).
Put a marker on the end of the RH needle so you know where one round (circular rows are called rounds aka rnds) ends and the next starts. 
Connect the ends start working the stitches that were cast on first
MAKE SURE THE STITCHES ARE NOT TWISTED. If they are and you keep going without fixing it you will have to unravel all your work and redo it. Not fun, my friends. Not fun at all. So if the stitches are twisted, untwist them and then start knitting. Just go around the circle until you get to the marker. Then just slip the marker from LH needle to RH needle and keep going! Simple! 
So that's pretty much it. I'm going to save the Double Pointed needles for the next post. 
So now I'm going to make a little tribute to a YouTuber named Connor Franta. He's amazing. If you watch his videos you will understand this next part. 
Okeyyyy I'm gonna go! So today we talked about knitting in circles an circular knitting and yarn and needles and I don't even know what Wbsognrks bouyyyyye!!!!

Wednesday, July 17, 2013

My New Puppy

Last week my family got a new puppy!! He is about 8 months old right now. My brother named him Caspian. I'm not sure if I like that name but whatever.

He is so cute!
I think he is a Carolina Husky mixed with  a German Shepherd. But he is absolutely nutty!!!!


Pittsburg Penguins Knitting Chart

The Penguins; I can't stand them, but I won't get into that in order to avoid offending any of their fans...

Boston Bruins Knitting Chart

The Boston Bruins may not be a team that I actually like, but I have to admit their logo is kind of cool.

Lesson 9: Seeing Double

The duplicate stitch. So useful, so helpful, so easy! Yes this lesson is about the duplicate stitch: what it's for and how to do it. Looking at pictures of the stitch it looks a little difficult, but it is actually pretty easy!

The duplicate stitch is used for adding patterns and designs to your knitting, much like fair isle, but this stich is better for using many colors and if the design is spread out. It is also useful when you want to put a motif on a knitted piece but you're not sure where exactly. You can just put it on after you have finished knitting!

Step one is o cut a piece of yarn in your desired color. Usually I cut the yarn about 3 feet long or a little shorter when I know that I am going to need multiple long strands to fill the entire space that I want to fill, but if you know that you don't need that much you can just cut less. I use a plastic yarn needle with a fairly large eye because those are comfortable for me to use, but use whichever type you prefer.

Step two is to figure out where the yarn needs to go on the knitting. It is best to start at the bottom of the design on either the left or right side, it doesn't matter in this case.


Step three: poke the needle from the bottom of the knitted fabric at the bottom of the stitch that needs to be covered with yarn. In the picture, if I wanted to cover the blue stitch with yarn, I would poke the needle up through the red dot. Pull the yarn through the fabric until you have about 2 inches on the underside. Hold that piece for a few stitches until it is secure.


Step four is poke the needle down through the top corner of the stitch (if you are starting from the left side of the design, poke the needle down through the left corner. If you start from the right side of the design poke the needle in the right side of the stitch). Then, poke it back up through the other side of the stitch and pull the yarn through until it is snug but not tight.
In the picture to start from the right side of the design, poke the needle down through the blue dot and up from the red dot (it's the opposite for starting from the left)
The key is to bring the yarn under the purple stitch


Step five is to poke the needle back down through the bottom of the stitch in the same place where you started with it. Then repeat steps two through five for the rest of the stitches. To finish off the yarn secure it by pulling it through a few stitches on the back of the work, but make sure you can't see the yarn on the front of the work where it shouldn't be seen.

And that's all there is to it! For many of the fair isle charts that I have put on the site it may be easier to use the duplicate stitch for them rather than fair isle because of the intricacy and use of multiple colors in a row.


Chicago Blackhawks Knitting Chart

This is the Chicago Blackhawks logo. For some parts you will have to use a stem stitch. These areas include the yellow lines on the hair, around the white part of the eye, and the lines on the feathers. I would also outline the feathers in black stitching.

Monday, July 15, 2013

Coming Soon: NHL Charts!

So I was trying to figure out what my next post should be. And then, like a ton of bricks, it hit me. NHL logo charts! I have already made the New York Rangers chart so I figured why not?!
I'm going to use a program that I know if to create fair isle charts for all of the NHL teams! Some of them will be easier to do the duplicate stitch which I will make a tutorial about for those of you who don't know how to do it.
I'm planning on doing all the logos eventually, but If you have any requests for me to do some sooner than originally planned leave a comment below!
Happy knitting!!

Friday, July 12, 2013

Pretty Little Liars Sleep Mask Pattern

When I made this I was really bored so I thought, "hey, why not make a PLL sleep mask?" Yes, I realize that I have very random thoughts. Of course you can use any design that you want. to use this pattern make the design 22 sts wide and 37 sts long.

So the materials are...
DK weight yarn (I used Classic Elite Yarns Premiere which I think is no longer being made. I probably used about a little less than half the skein)
Contrasting yarn in DK or Worsted weight ( I used Berrocco Vintage that I already had and you don't need much because it's for the words.)
Size 3 straight needles
Yarn needle


Instructions:

CO4
Row 1: k1, inc, inc, k1
Row 2 and all other even rows (unless otherwise stated): Keep first and last 2 sts in garter st and purl the other sts
Row 3: k2, inc, inc, k2
Row 5: k2, inc in next 4sts, k2
Row 7 k2, inc in next 8 sts, k2
Row 9: k2, inc in next 16 sts, k2
Rows 11, 13, 15: knit
Row 17: k2, work cable #1 (sl 2sts onto cable needle, hold in back, k2 fom LH needle, k2 from cable needle), k1, work design over next 22sts, k1, work cable #2 (sl 2sts onto cable needle, hold in front, k2 from LH needle, k2 from cable needle), k2
Continue working design over center 22 sts, keep outer 2 sts in garter st, work cables every other knit row.
Row 55, 57: knit
Row 59: k2, k2tog 16times, k2
Row 61: k2, k2tog 8 times, k2
Row 63: k2, k2tog 4 times, k2
Row 65: k2, k2tog 2 times, k2
Row 67: k1, k2tog 2 times, k1
BO

Ties (make 2)
Cast on 50 sts, bind off
Tie to the ends of the mask
Weave in ends


Here is the chart for the design I used. Start on the right side of the chart and work the pattern from right to left, starting with 1 and ending with 22 where I mention the "center 22sts".

Tuesday, July 9, 2013

New York Rangers Logo Knitting Chart

This is the logo of my all time favorite NHL team the New York Rangers! I love these guys!

Pretty Little Liars Chart

This is a chart that I made on Tricksy. I made the chart so that I could put it into a little sleeping mask since Pretty Little Liars is one of my new addictions. I seriously cannot stop watching that show. Thank goodness for Netflix!
Anywho this chart is pretty simple and you can chose so many different color combinations!

Fair Isle Coasters Pattern

These coasters will utilize the skill you learned in lesson 8: fair isle knitting! They are easy to knit, but take some time because of the design incorporated in them. There are 4 different designs to chose from so you can make a set of 4 or 5 and have them be matching or combine the designs to make a unique mismatch set.

Materials:
Acrylic worsted weight yarn in 4 colors (I used Red Heart Super Saver because the colors are bright and they are machine washable and dryable)
I'm not really sure about how much of each color you will need but for a guess I would say as long as you have at least half a skein that will be enough.
Straight needles size 7
Yarn needle for weaving in ends


Instructions:

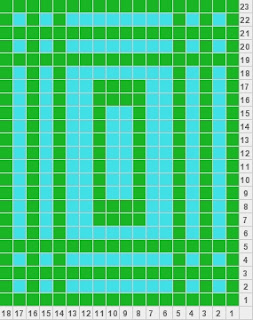
For each coaster you will start out by casting on 17 sts

Some of the designs involve using more than 2 colors in one row. Here is a video to show you how to do that 3 Strand Knitting

 The charts look rectangular but the coasters will be squares


<-------  Start Here at the 1 and go to the left. On the purl row, start at the 18 on row 2 and work to the right.
 On the cast off row for this coaster you can use plain yellow to make it easier to have a neat edge.


Here where there is this large yellow section, you do not have to carry the pink across the back of the work, but you might want to in order to make the entire piece have the same thickness.


For this one you can eliminate the pink if you don't want to have 4 colors in the same row. Instead you can use blue or yellow there.

Monday, July 8, 2013

Lesson 8: Rainbow Knitting

In this post I'm going to talk about how to make your knitting super colorful. The methos that I am going to teach you is called fair isle. I don't know why it's called that. It makes no sense but whatever.
Fair isle has so many different uses; it's fantastic!! You can use it for making little pictures on a piece or repeating patterns or motifs or anything that involves more than one color in single row.

This might look a bit difficult at first. Looks are not deceiving here. But there is hope! As with every technique on this site with practice, comes skill. To get started you're going to need to different colored yarns and a pair of needles. I think using some cheap acrylic is just fine for practicing.

First cast on 10 sts in one color. This is going to be color 1. Knit a few rows in stockinette stitch to start out. Now we are going to add (wait for it...) a second color!! Trust me it will be fun! So just knit 2 sts and then when you put the RH needle into the next stitch wrap it with color 2 aka red in my chart. Finish the stitch normally and let color 1 hang down behind the work. Do the next stitch with color 2 again. Then on the 5th stitch of the row insert the RH needle, pick up color 1, drop color 2 in the back and wrap the needle with color 1. Just let color 2 hang down. When you wrap the needle with color 1, don't pull it tightly. Instead just pull it enough to make it flat on the back of the work. If you pull it tightly the work will look  puckered on the front. Do another stitch in color 1 and then drop color 1 and pick up color 2 again.

When you get to the purl row, pretty much everything is the same except you drop the yarn in FRONT of the work instead of the back. You want to make sure you always have the yarn dropped on the same side so that one side looks clean and neat and the other has a bunch of pieces of yarn across it.
Basically that's it! But obviously you are going to be dealing with a little more than just knitting 2 sts and then changing the color. When you have patterns with more than 2 or 3 sts in the same color, you're going to have to carry the other color in the back of the work. It's pretty easy to do. To make it easier to explain, I'm going to use an example. So say your pattern says you need to knit 2 sts in one color and then 5 sts in another color then 3 more sts in the first color. What you do is knit the two sts in the first color normally, then knit a stitch in the 2nd color. On the 2nd stitch of the 2nd color, *insert the RH needle in the stitch as if you were going to knit it. Then, wrap the needle with color ONE not color two. Wrap the needle with color two then unwrap color one. The two yarns will be twisted around each other. Finish knitting the stitch. Then knit the next stitch normally with color 2 and repeat the process from the * until 4/5 stitches of color 2 have been knit. When knitting the 5th stitch you do not need to wrap the first color and then the second color, just work it normally.
After all 5 sts have been knit, change the color and knit the next 2 sts with color 1.

I hope this has been helpful if you are looking to learn how to knit fair isle! It is an essential skill for any knitter who wishes to advance their talents. Wow that sentence sounded super smart....
The next post will be a fair isle pattern for beginners so be on the lookout!
Happy knitting :)

Owl Pattern

This owl pattern is soo cute!! I made on for my brother for his birthday and he loves it! I made the head a little too small at first so I modified the pattern to hopefully make it a little bigger. If I were to make the owl again I would turn it inside out so the purl side is showing to make it look like there are feathers. That's what I did for the wings here and they look better this way I think. Sorry I don't have any picture :( It is as life like as I could make it!

Materials:

1.5 skeins of Lion Brand Jiffy Bulky
4 size 5 double pointed needles
A few yards of black worsted weight yarn

Instructions:

Body
CO 6 evenly
Rnd 1: inc in all sts
Rnd2: (k1, inc) around
Rnd 3: (k2, inc) around
Rnd 4: (k3, inc) around
Rnd 5: (k4, inc) around
Rnd 6: (k5, inc) around
Rnd 7: (k6, inc) around
Rnd 8: (k7, inc) around
Rnd 9: (k8, inc) around
Knit even for 4 rounds
K9, k2tog, k29, m1, k20 (this round will be called the % round)
Repeat % round 3 times
Adjust the sts so there is an even amount on each needle (it might not be perfect but get it as close as it can get)
Knit 4 rounds even
Repeat % round 4 times
Knit 4 rounds even
Repeat % round 4 times
Knit 5 rounds evens
K38, k2tog, k to end (this is the & round)
Knit 1 round even
Repeat & round
Knit 5 rounds even
Repeat & round 7 times
K2tog at the beginning of each needle
Adjust the sts so there is an even amount on each needle (it may not be perfect but close is good)
Knit 10 rounds even
Stuff owl
Work 5 rounds even
(k to last st on needle, k2tog) repeat ( ) for both other needles
K2tog at each end of each needle
Stuff head and draw yarn through loops to finish

Wings
(These are worked flat)
CO2
Row 1: inc in both sts
Row 2 and all even rows until further notice: Purl
Row 3, 5, 7, 9, and 11: inc at each end
Row 13 and 15: inc in first 2 sts and last 2 sts
Row 17: rep row 3
Row 19: rep row 13
Row 20-30: work even
Row 31: inc in first and last st
Row 33: rep row 31
Row 35: k1, k2tog, k14, k2tog, k14, k2tog, k1
Row 37: k16, k2tog, k16
Row 39: k2tog, k2tog, k11, k2tog, k11, k2tog, k2tog
Row 41: k2tog, k8, k2tog, k8, k2tog
Row 42: p2tog at each end
BO
Fold wig half and whip stitch the edges together. I kept the purl side out because I though it looked more like feathers and I didn't add any stuffing. Sew onto body using the photo for placement.

Legs
(These are worked in the round)
CO3 evenly
Rnd 1: inc in each st
Rnd 2: inc in each st
Rnd 3: inc in the first st on each needle
Rnd 4-11: work even
Rnd 12: inc in the first st on each needle
Rnd 13: work even
Rnd 14: inc in 3rd stitch on each needle
Rnd 15: inc in first st on each needle
BO all sts

Feet
CO3 on 1 dp needle
Work 3-stitch i-cord for 6 rows. Do not cast off; put the 3 sts on a separate needle. Make 2 more pieces in the same way. Put all 3 pieces on the same needle and make sure you have a piece of working yarn on the left side. Knit across all 9 sts. Work 2 more rows of the 9-st i-cord.
Next row: k2tog, k2tog, k2tog,k2tog, k1
Next row: k2tog, k2tog, k1
Work i-cord with remaining 3sts for 5 rows
BO
Tie a small piece of black yarn to each toe and hide on end inside the toe so it is not visible. These are the owl's talons.
Attach the feet to the bottoms of the legs. Stuff the legs and sew them to the bottom of the body.

Embroider a face on the owl. You can embroider the beak if you don't know how to crochet but if you do this is the beak pattern:

Ch4, turn
In second st from the hook work a slip st, in the next chain work a sc, in the next chain st work a hdc st. Finish off and use the tails to tie the beak to the face.


And now you have a big fluffy owl friend!! If you have any questions about the pattern or find any mistakes please ask/tell me in the comments and I will get back to you ASAP!


Etsy.com


I have recently opened up my very own shop on Etsy! I sell a bunch of random handmade stuff so please check out my shop and see what you like!

The name of my shop is HalainnLucyHandmade. Here's a link! http://www.etsy.com/shop/HalainnLucyHandmade?ref=search_shop_redirect

Saturday, June 15, 2013

STANLEY CUP FINALS!!!

Ok so the Stanley Cup Finals have started and, frankly, I hope the Blackhawks grind the Bruins into the ground (or the ice...?) I really can't stand the Bruins. I won't say I hate them, though, because the only team that I actually hate is the Pittsburg Penguins. Can't stand them. It's a bit strange because my beesssst friend LOVES the Pens. She loves them like I love the Rangers. I want to marry many of the men on that team (the Rangers) except Rick Nash. But this post isn't about him. I'll save that for later so I can get into good detail about why he angers me.

ANYWHO

The Blackhawks must win. If they do not win this entire year will have been a complete failure in my opinion except for the Eastern Conference Finals. That was actually laughable (sorry Maddy...) but I definitely did not see that coming at all!
As for the West I really didn't know who was going to win the Conference Finals. I was rooting for the Hawks though because they are pretty cool. But I wouldn't have minded if the Kings had won. People on Instagram kept saying "Hollywood wants a sequel" which I thought was super funny.
Ok I'm done ranting about the finals for now. Tata!!
Also: next post is a pattern!!

Monday, February 18, 2013

Big Bow Baby Hat Patterns


These baby hats are sooo cute!! I saw a picture of something that looks exactly the same on Pinterest but there wasn't a pattern to go with the picture. I loved it so much that I just decided to make a pattern up myself. The giganticness of the bow is the best part. The yarn I used is machine washable and relatively inexpensive and it's really soft too. In this picture the white hat with the raspberry colored bow looks a lot smaller but both hats are exactly the same size. I'm not really sure what age babies these would be good for. I didn't really think that part out.


Materials:
Dk weight yarn in 2 colors (for two hats I used less than 127 yards)
Size 6 straight needles
Yarn needles

Yarn I Used:
Sublime baby cashmere merino silk dk in shades 0003 and 0217

Directions:
     Hat:
CO 72sts
Work in K2, P2 rib for 6 rows
Work in stockinette stitch for 6 rows
Change color
Stockinette stitch for 6 rows
Change color
Stockinette stitch until entire piece measures 4 1/2 inches
K5, (k2tog, k9) repeat directions in ( ) across the row
Purl
K4, (k2tog, k8) repeat directions in ( ) across the row
Purl
Repeat decreasing the amount of stitches before each decrease until you get to k2tog all the way across. Cut they yarn leaving about 10 inches and bring it through the stitches. Take all the stitches off the needle and pull the yarn tight so they all come together. Use the same yarn to sew the seam on the side of the hat. Weave in the ends to hide them.
     Bow:
CO 35
2 Rows K2, P2 rib
22 Rows Stockinette stitch. Purl the 1st and last stitch of every knit row to prevent rolling
2 Rows K2, P2 rib
Bind off
Cut a piece of yarn about 15 inches. Pinch the center of the bow with the rib rows on the top and bottom and wrap the yarn around the middle and use the 2 ends of the yarn to attach it to the stripe on the hat. Cut some smaller pieces of yarn and use them to tack the sides of the bow to the hat so they don't flop over. Make sure the pieces used for securing are tied tight so they don't come undone.


Saturday, February 9, 2013

Lesson 6: Flat Out Flat

K so there's a few different meanings for stiches in knitting. There are the stitches knit and purl and those are the basics, but you combine those two in different ways to make totally different looks. You can make knitting pieces look actually flat on one side and bumpy on the other. It's crazy.

The first stitch you should know is called stockinette stitch. It is probably the single most common stitch in the knitting world if you don't count cables and fancy lace patterns and that shtuff. This stitch will make your knitting look smooth and flat, just flat out flat, on one side and kinda like gravel on the other side. The best part is you don't even need to learn any new techniques! Basically just do one row in knit stitch then on the next row do the purl stitch. Keep alternating between those two stitches and BAM! You have stockinette power!

Next up: garter stitch. You have secretly been doing this the entire time. It's a conspiracy. You knit every row. No purling involved. Yep that's pretty much it.

Ribbing is usually done in the beginning of a piece or sometimes for the entire thing. It adds a nice edge and it's wicked stretchy. You can see it in most sweaters on the bottom hem and the sleeve cuffs. It looks like this:


There are different types of ribbing but they are all basically the same thing. You knit some stitches the move the yarn between the needles to the front of the work and purl some stitches. Then, you move the yarn back between the needles to the back of the work where it started and knit more stitches. You just repeat that process until you get to the end of the row and on the next row you do the same pattern. Whether you start with a purl or knit stitch on the next row is determined by the last stitch you did on the previous row. If you did knit stitches on the first row the 2nd row will start with purls and so on. The pattern you use will tell you how many stitches to knit and purl. In this picture it's k2, p2. It could be abbreviated ad k2, p2 rib or 2 by 2 rib. There are other styles such as k1, p3 which has a much different look or k3, p2 which looks different too. You can experiment with the different types if you want.

All of these stitches can combine or just one can be used in a pattern to make the knitting look interesting and unique. I think you should practice stockinette stitch and ribbing the most since those are the hardest to learn plus you have already done garter stitch. Also because the first pattern I post will use both of those. (I have a master plan behind all of this posting)
Peace out.

Friday, February 8, 2013

Lesson 7: Messin With Your Eyes

Welcome back! I bet you have been wanting to know how to shape your knitting. I'm kidding. You might not have any idea about what I'm talking about. When you add shape to knitting you have to decrease and/or increase the amount of stitches on the row once you are already into a piece. By doing this you will make the knitting smaller or bigger. It's hard to explain. How about some visuals?

Here is a piece that has a lot of decreases in it. That's why it appears to get narrower at the top. It isn't just messin with your eyes. When you decrease you can use different methods to make the decrease go in different directions. That's why the lines near the edges in the picture go like this / \ instead of this // or this \\. I'll teach you the easiest ways to decrease. They are pretty simple I think.


For increasing It's a similar story. There are different ways that make the stitches appear to go in different directions. This is what it looks like. Bigger on the top. I should probably mention that when you knit you almost always go from the bottom up. I can see how that would be confusing. You can increase or decrease a little or a lot. It all depends on what shape and size you want the knitting to be.


So the first style of decreasing is knit 2 together (abbreviated as k2tog in almost every pattern). In this method you take 2 stitches and join them together into 1. It is really simple to do also which is convenient. Basically just knit normally except in the first part when you put your needle tip into the stitch put it into 2 stitches not just one. Then knit them together as if they are one. On the next row it will just be one normal stitch.


Next is purl 2 together (p2tog). This is less common because a lot of the time shaping is done on the knit rows. It's pretty much the same exact thing as k2tog except you treat the 2 stitches like 1 purl stitch. Simple.

For increasing there isn't really a way to do it that's as simple as those decreases. One way I like is called make 1 (m1). You have to do this between stitches. Just put the needle tip between two stitches under this thing called the bar. The bar is the strand that you can see if you stretch the work and move the needles away from each other.


Pick up the bar on the LH needle and knit into the BACK of it. What I mean by the back is in that picture right there.
If you don't knit into the back of the stitch you will get holes in the knitting on all the m1s so make sure you do that.

So there are some increasing and decreasing methods. There are some more advanced ones which I will make posts about in the future. But now since you know about shaping I am going to put up a pattern in the next post! I know it took forever to get through all these lessons but hey you gotta start somewhere. Adios


Lesson 5: The Grand Finale

So now you know all this wonderful stuff about knitting! Unless you just wat to knit one endless strip I suggest you learn how to bind off. It's important that you bind off correctly or you work will unravel and that would just be a problem. There are a lot of different methods to this that will give you a fancy edge, but this is the most basic and you will end up with a clean straight line on top.


The first thing you want to do is knit (or purl) 2 stitches. No more, no less.


Now use the tip of the LH needle to bring the last stitch on the RH needle (the first one you knitted) over the top of the other stitch.


This might be a little difficult a first and especially if you knit the stitches too tight. Make sure the first stitch doesnt come off too when you do this.


 After you bring it over the top of the other stitch slide it right off the needle.


Then knit another stitch from the LH needle and repeat the process of bringing the last stitch over the first one and off the needle.


Keep on doing this until there are no more stitches on the LH needle and there is only one stitch left on the RH needle. Cut the yarn about 5" away from the work (or longer if you are using the tail to sew peices together) and pull it throgh the loop. Pull it tight so it is secure and you are done! See it's not that hard is it. Well maybe. But the brigt side it you will only have to do this once for every piece you knit.


You can leave questions as comments if you want. Happy knitting :)

Monday, January 28, 2013

Lesson 4: It Kinda Looks Like Gravel

Well you already know one of the major stitches of knitting so I guess you might as well learn the other. This one is not easier or harder just different. It is called the purl stitch and it kinda looks like gravel.
You can start doing this stich after doing rows of the knit stitch; starting a new knitting piece is not necessary.


To start you have to put the point of the RH needle into the first stitch on the LH needle from top to bottom (with the knit stitch it's bottom to top). Hold the needles in an X with the RH needle in front.


Then wrap the yarn around the RH needle from left to right over the front of the needle on the left side


Bring the LH needle over the top and to the front of the RH needle.


Slide the stitch off the LH needle and tighten the yarn a little. Don't pull too much because it will be super hard to do the next row. See it's simple! Just like with the knit stitch you have to practice this one definitely. The yarn should still be in the front of the work after each purl stitch. Practice this stitch for a few rows or until you get pretty good at it so that you can be ready for the next lesson!! If you have any questions about this or any other stuff on the site leave a comment on the post and I'll get back to you on that.

Happy knitting :)

Ps. These aren't my pictures because I was having a lot of trouble with my camera (that's why I haven't posted anything in a long time) so I used Google images to find them.

Thursday, January 10, 2013

Ravelry

This week I wanna talk about Ravelry. This is one of my favorite websites! It has a ton of different shtuff for knitters and crocheters alike. There are a gazillion patterns for knitting and crocheting, this thing called "stash", projects that other people have done, a library of patterns and books, and more too.
The stash is where you can log different yarns you have in your stash at home. You can enter the specific name and brand of the yarn and color and even where you bought it and for how much. You can put a picture of the yarn too. Then, you can look at the yarns other people have and they can look at yours. This is really helpful when you are just looking for some type of yarn for a project but you don't know what one to chose.
You can have friends on the site too and send messages to other members. There are different groups for charities and just plain fun on the site too. If you see someone who has yarn in their stash for sale you can buy it over the internet and even sell your own yarns. People also put patterns and links to patterns too. There are free ones and some you pay for but there are filters and stuff so you can search for specific stuff. 
So you may think that this website sounds like the bomb (that would be because it is). There is a down side though :( Just kidding there is no down side! It is always free too unless you want to buy a pattern. So go forth and knit! Here's the link: Ravelry.com